Info

How to Take Screenshots on Windows 10

Do you need to capture Windows screen? Whether you want to share with colleagues or simply wish to save the display, screen-capturing makes everything easier. The question is, how to take a screenshot on Windows 10?

There are few ways that you can do to take a screenshot, be it for the entire display or only part of it. Upgrade your computer skills and learn how to capture screen on Windows 10 right here.

Ways to Take Screenshots on Windows 10

Windows 10 comes with built-in tools that enable you to capture screen with ease. Unfortunately, not many users know this feature. Check out the following list and get inspired!

1. Snipping Tool

Snipping Tool

This built-in tool has been around for a while. Since Windows Vista, the Snipping Tool becomes a reliable feature to take screenshots on PCs. How to use this tool is super easy as it doesn’t require too many steps. Learn how to use Snipping Tool below:

  • Open Snipping Tool from your search bar.
  • Once opened, click New button and choose the area you want to capture. It can be in a rectangular form, free-form, and full screen.

Please note that it won’t automatically save the screenshots. You will need to save it manually before exit.
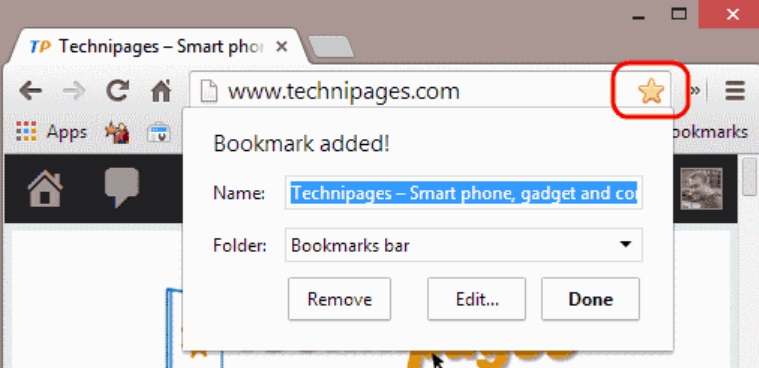
2. Snip & Sketch

Snip & Sketch

Snip & Sketch is a newer version of Snipping Tool. This built-in tool lets you take screenshots and share it as a new image file. Without the need of downloading, you can easily call up the tool with keyboard shortcut.

Here is how to take a screenshot using Snip & Sketch:

  • Press Windows key + Shift + S.
  • Once you press the keys, the screen will dim.
  • You should also see a small menu at the top of the screen. This menu can be used to take a screenshot, either free-form, rectangular, or full-screen.
  • Drag the pointer to determine the area to be captured.
  • Once a screenshot is taken, it will be saved to clipboard.

In case you access Snip & Sketch from the Start menu, you will see a window at the top of the screen. Click New button and move the pointer to capture the desired part of the screen.

3. Print Screen

Print Screen

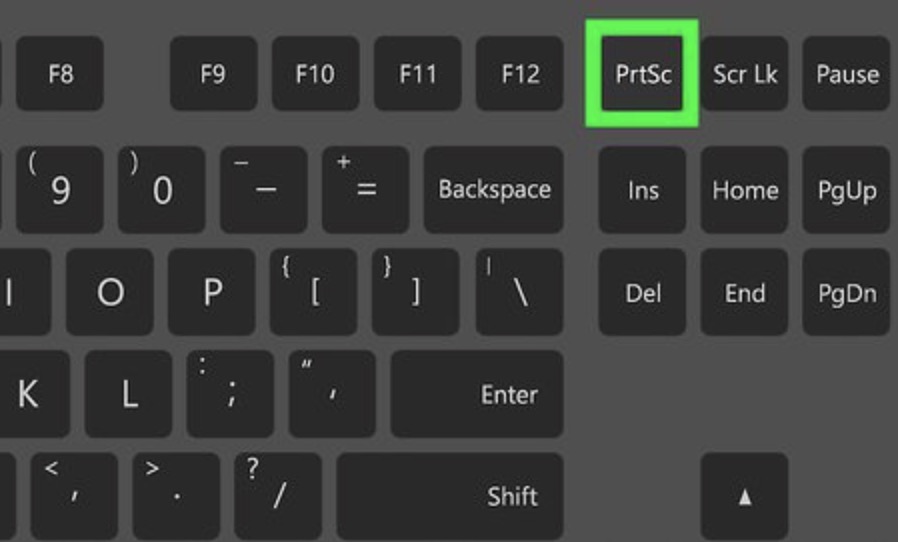
As you can read on Androidally.com, Print Screen is one of the easiest ways to capture screen on Windows 10. With Print Screen, you don’t need to open a tool or install any apps. Everything can be done right from your keyboard.

However, your screenshot is not saved as a file. Instead, it will be copied to your clipboard. That means you can copy the captured screen on MS Windows or open via Microsoft Point.

How to take a screenshot using Print Screen? Follow the steps below:

  • On the desired display, press PrtScn on your keyboard.
  • Open Microsoft Word or another image editing tool, then copy the screenshot.
  • If you choose to use MS Word, press Ctrl + V to copy.

Print Screen is the quickest and easiest way to take a screenshot. However, it only works to capture the entire screen.

4. Windows Key + Print Screen

Windows Key + Print Screen

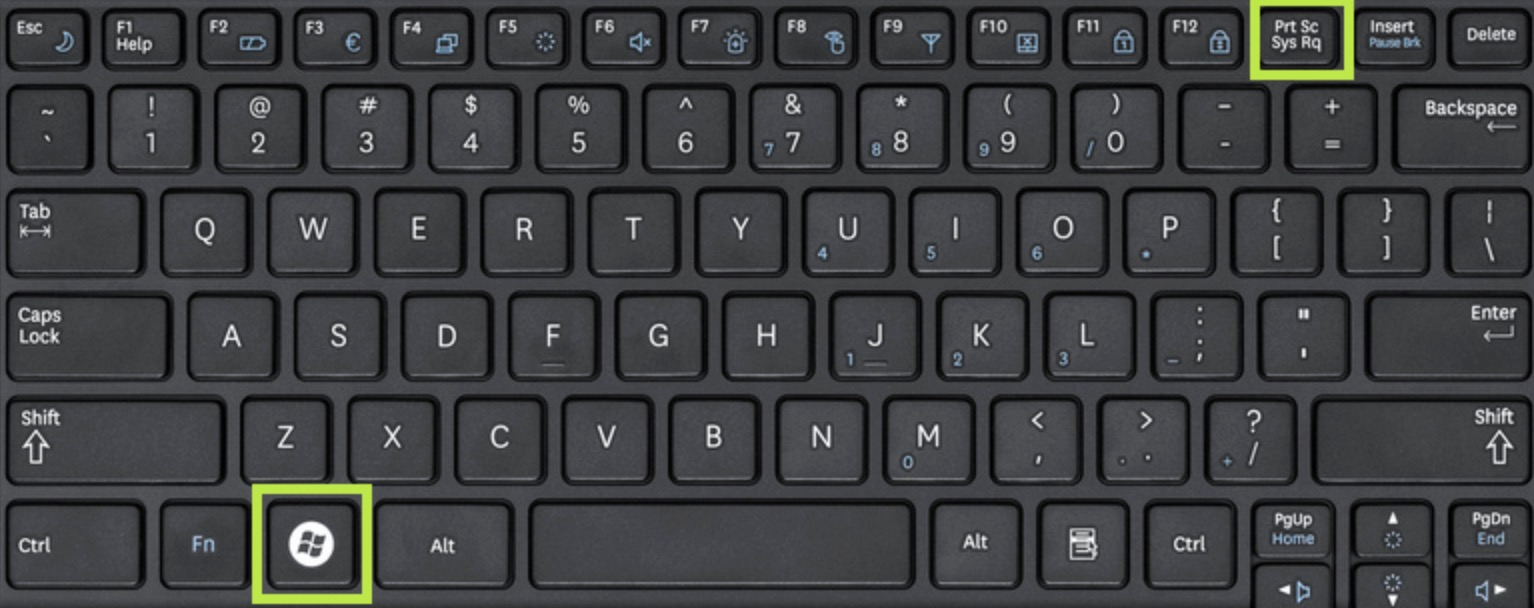
Still using Print Screen, there is another way to capture screen and save it automatically as a new file. By pressing Windows Key and Print Screen accordingly, you can take a screenshot of the entire display.

With this method, the screenshots will be saved to the Screenshots folder instead of copied to clipboard just like when you press only Print Screen. Here is how to get it done:

  • On the desired display, press Windows key + PrtScn.
  • The screen will dim, which means the screen is already captured.
  • Go to Pictures, then choose the Screenshots folder to find the image.

Taking screenshots on Windows 10 is not a big deal. Now that you know several ways to capture screen, you can easily share with friends or save the display for later.

Continue Reading
Info

How Updates For Bluestacks Without Losing Data

How Updates For Bluestacks

Sometimes the application you use won’t last long. Even the performance is not as good as before so that it will disrupt your activities. Therefore, you must make updates for Bluestacks to get even better performance results. The following is a way to properly update the Bluestacks application so as not to lose data.

How Updates For Bluestacks

1. Don’t Uninstall the Installed Bluestacks

The first thing you should do when updating the Bluestacks application is not to uninstall the installed Bluestacks. As the name suggests, the update is to renew instead of replacing the application with a new one. Therefore, this is the answer to the most popular question, is Bluestacks safe to use?

Of course, Bluestacks data is very valuable and it’s a shame if you have to lose it. Because it will be very inconvenient if you have to re-enter data or even replace it with a new one. Therefore, once again do not let you uninstall the existing Bluestacks application because it will make your data disappear.

2. Check your Bluestacks Version

One of the several ways updates for Bluestacks is checking the latest version of your Bluestacks. If your Bluestacks version is below the latest version, then it is safe to do. But if your Bluestacks version is very far from the latest version, you should not just update.

Bluestacks Version

This can affect the success or failure of the update that you do. It could be that the Bluestacks application was not successfully upgraded and you cannot use the application anymore. Therefore, make sure to check your Bluestacks version before updating it.

3. Download Latest Setup of Bluestacks

One of the several ways updates for Bluestacks is to download the latest version of the application. Of course, you have to do this to update your old application with a new one. You should download from the official website of Bluestacks to be safer or avoid viruses. Do not occasionally download the application from other unofficial websites.

Of course, to update if you haven’t previously removed the Bluestacks application, you must have the latest application. The reason is that all the updated specifications are in a new application. Therefore, it is safer if you download it from the official website because it is certainly more reliable.

4. Install the Latest Application

One of the several ways updates for Bluestacks is to install the application that you have downloaded. The trick is to open the download folder where the application is located. Then do a double click or right-click and select open. After that, select Next until the window shows the installation process. Then wait a few minutes for the process to finish. That way your Bluestacks application has been updated without losing data.

That way your Bluestacks application has been updated without losing data. Then you can prove whether the update process was successful or not. The trick is to try to open the application. If it appears as usual then the process is successful and you can use it again.

That’s 4 ways to update Bluestacks that you can do without making data disappear. Data in an application is very important and will be troublesome if lost. But if you do the update correctly then you will not lose data. Therefore, the explanation above is to help make an update without losing data.

Continue Reading
Info

How To Remove A Section Break In Word Document

Section Break In Word Document

What should you do if you want to make a document with different formats? Section Break tool will help you to do that. However, what if you want to change the document with a different format into one same format? Well, you can also use this tool. To be more precise, you just need to remove Section Break in the document. Just like how easy it is to insert Section Break, the method of how to remove a Section Break in Word is also simple and easy.

Remove Section Break Manually

There are some ways to remove Section Break in a document. One of them is breaking it with a manual method. This method is very easy. You don’t need to spend much time just to remove this tool.

Remove Section Break Manually

  • The first step on how to remove a Section Break in Word manually is to click the menu home. There, you will find a tool with symbol ¶.
  • After that, click that symbol and all the paragraph marks and symbols of hidden formatting will appear on your monitor. What you need to do next is find the Section Break symbol in your document.
  • When you have found the Section Break symbol you want to remove, move your cursor onto that symbol.
  • Then,  just press the delete key from the keyboard. And voila! The page where the Section Break is removed now has the same format as the page before.

If you want to remove more than one Section Break, you can find the other symbol and delete it with the delete key.

Using Find and Replace Features to Remove Section Break

Removing Section Break in Word is not limited to the manual methods. You can also use the features that already exist in Word. It is a Find and Replace feature. And you can find the steps on how to remove Section Break in Word using Find and Replace features here :

Using Find and Replace Features

  • First, you need to go to the home menu. On the right side of this menu, you will find Replace and click it. But, you can also press the Ctrl+H key in your keyboard if you can’t find the replace menu.
  • After you click Replace or pressing the keys, a dialog box will be open. There are two columns in the dialog box. The first one says Find What, while the other says Replace with.
  • You need to write ^b in the Find What column and type nothing in the second column.
  • After that click Replace all and you will see another dialog box that says how many Section Break you’ve successfully deleted.
  • Click OK on the dialog box to finish the steps and close the dialog box.

Now, there is one format in your document.

The method on how to remove a Section Break in Word has the same difficulty with how to insert Section Break. If you’ve already got used to Microsoft Word, neither insert Section Break or Remove Section Break will bring you any trouble. What you need to remember is, if you remove Section Break on a certain page, the page before and after the break will combine into one page. And the format will follow the second page.

Continue Reading
Info

5 Things About Lemongrass Life Cycle You Must Know

Lemongrass Life Cycle

Planting lemongrass is easy but quite tricky. It can grow inside and outside your house. Luckily, you don’t have to be in tropical lands too. Even in the winter or rainy season, you can have them on the pot inside your house. That is why you need to learn how to harvest lemongrass in any climate and media. But knowing the lemongrass life cycle is important too.

The lemongrass life cycle is not like other herbs. We can say that it is fast-growing, and you can get unruly when it is not pruned regularly. Moreover, when your lemongrass gets enough sunlight. The plant will absolutely fertile and quickly grow into a bundle. Remember, the keys to planting lemongrass are the sunlight and the water to keep it moist.

The Lemongrass Life Cycle

Planting the lemongrass can be started by using its stalk or bulb with the attached roots. Choose the tough stalk the put in the pot with water. The other method is by using a pot with soil. Place the bulb in the pot. Make sure the roots are covered by the soil. By trying these two methods you only wait for about one month to get them re-rooted. More details about its growing process, see the lemongrass life cycle below:

  1. Sow and Plant

It is better for you to start planting the lemongrass in the early summer. The soil is warm and suitable for the roots. Choose the right stalk, which has a tough structure, and put inside the water. Or, you can also cover the roots with soil. Place the pot inconvenient space of sunny spot. Your lemongrass will love it.

  1. Re-rooting

It takes about one month to get this process completed. The new root will raise approximately after a month since it is sowed. So, that is why we suggest you start in early summer to get this process at the right time. If you see the roots are growing, or the leaves appear, it means your lemongrass is growing. Cut back the leaves in 3 inches (8 cm) length.

  1. Troubleshooting

Just like planting the herb, there will be pests bother. For example, when you put it inside your house, the spider will be its enemy. And as the lemongrass grows, it might need a bigger place to develop. Also, if you keep it in the same spot, the plant may rot in poorly and form a tight clump. Use a sharp spade and move the plant to a larger pot as needed.

  1. Trimming

Trimming is an important part of planting the lemongrass. It is good to manage its size due to stimulating new growth. Cutting the stalk and use it for cooking will keep the plant in check, but however, you cannot hold it’s quickly growing. The lemongrass will get pruning. The best time to do trimming in early spring or when it is dormant. You might find the dead material or dried parts. Get rid of those parts.

  1. Harvest Time

You can harvest lemongrass anytime once the stalks reached 1.3 cm in diameter. It is enough to be harvested. Cutting them at the ground level by using a knife. Another sign that your lemongrass is ready just the leaves. If it is 10 inches tall, cut them and use them for your dishes. When you remove the leaves, you won’t hurt the other parts. Your lemongrass will keep growing.

If you don’t use lemongrass in cooking very often, remove the leaves or wilted parts regularly. Or, you can move the healthy stalks to another pot. Don’t forget to bring the roots too. The lemongrass life cycle is counted fast. Once you forget to manage its crowd, you will find a messy corner inside your home.

Continue Reading
Info

5 Things What You Need To Know About Instagram Captions

Instagram Captions

Instagram captions are a must when it turns out that you have a picture to post. Moreover, if you like posting on Instagram, that captions are what make your picture alive. What you need to know about Instagram captions is about how to write the good captions.

Most of Instagram users use captions to express their feeling. Moreover, there are more things that you need to know about Instagram captions. Writing good captions will make you get more likes and followers.

What You Need To Know About Instagram Captions

Here are five things that you need to know about Instagram captions.

  • Hashtags

Hashtags have an important role in Instagram captions. Using hashtags shows where the captions go. Moreover, it tells a lot about what the writer is trying to write. Hashtags make the post more natural and creative.

In most of the competition, hashtags are a must. Most of the participant has to follow some requirements involving writing a hashtag.  Therefore, involving hashtag in writing a caption could make your caption more unique. There’s also another advantage of the hashtag. It’s to make others easier to find some related posts.

  • Emojis

Most Instagram users love using emojis to express their feeling. Sometimes, the word can’t represent our feeling. Thus, emojis become a choice for a caption. Giving one emoji in a post could show many meanings. Moreover, writing captions and put emojis at the end of the sentence to show emotion.

You could use emoji to express the different meaning of what you are trying to write. For instance, you could write “I’m happy now” followed by sad emoji. It shows that you don’t feel happy but you are trying to be happy.

  • Tags

Apart from hashtags and emojis, tags also have the same roles. Tagging friends in your post will make others feel their existence. In addition, tagging is also one way to interact with others like your friends.

If you are a marketer and do a giveaway, tagging is worth a try. By asking the audience to tag their friends, it will add more followers. This is one thing what you need to know about Instagram captions.

  • Word Choice

Word choice plays an important role in writing a good Instagram caption. You have to use some words matching with one another. Moreover, if you use the proper words which can describe the picture you post. Word choice becomes something crucial in writing a caption.

Therefore mind what you are trying to say. Use a proper word and try to avoid bad words. The words that you use show who you really are.

  • Picture

Select the best picture on your phone when you want to post it on Instagram. Mind the angle and the light. In addition, use the real picture and not the fake one. Your picture will attract anybody who sees it.

Thus, using a good picture with good quality is a must. Remember, on Instagram you have followers and they see what you are doing.

Those all about five things what you need to know about Instagram captions. Writing a good caption will give you many benefits. Moreover, if you are a marketer, writing good Instagram captions will help you the most.

Continue Reading
Info

How To Turn Off Waze When Not In Use Completely

If you are looking for a solution on how to turn off Waze when not in use, this time you are lucky enough to find this article. It is because sometimes you may get the situation where you can still see the Waze location on even though you quit the Waze app.

Now the question is; why do you need to turn off the Waze when it is not in use? When it is not troubling you then why you have to turn it off? Well, in this case, you have to know that letting the Waze on is influencing the battery to get low quickly. Therefore, it is much recommended to turn the Waze on while driving and turn it off when you have reached the destination.

To turn off Waze completely, you need to know more about the Waze map and location change reporting (iOS only) as well as how to turn off the Waze app.

Waze Map Location Service

If you are iOS users, there are two options for Waze location access. Take a look by going to Settings -> Privacy -> Location – > Services -> Waze. In this case, you can choose to manually turn on the Waze app every time you use the app on your phone. However, you can choose the option “While Using The App” to allow the Waze to use the location service only when Waze app is used.

Location Change Reporting (iOS Only)

Typically, Waze will access your recent location although you are not using the app to alert you about the calendar event on your iOS particularly when you plan to drive or when you want to leave notification.

In this case, Waze uses the location change reporting feature to leave the reminders through the iOS calendar events.

How to Turn Off the Waze App

If you see your battery is going to drain quickly because of the Waze status which is always on, you might go think about how to turn off Waze when not in use. Battery draining may cause you to feel uncomfortable so that you have to turn off the Waze soon. In this case, you can do it by opening the Waze App > Go to Waze settings > General > location change reporting > turn off.

It is important to remember the step above in order to successfully turn off the Waze while you are not using it. Once you successfully turn it off, there will be no notification “Time to Leave” as the reminder from your Calendar events or planned drives.

By turning off the Waze, you will be no longer feel unpleasant because of the reminders and the draining battery. Just remember the step of how to turn off Waze when not in use especially when you have more planned drives.

Conclusion

In conclusion, experiencing difficulty on how to turn off Waze when not in use will soon disappear from your problem list as soon as you practice what you have just read on this article.

Continue Reading
Info

How To Connect To Public Wi-Fi on Android with 2 Easy Methods

When you find a troubleshoot in connecting the public Wi-Fi on your Android, it means you need to read the review of how to connect to public Wi-Fi on Android that we are going to share on this page. Although you often find it easy to connect, a certain condition sometimes makes you difficult to do so. It can be an error on loading the Hotspot Portal Page or another case.

Commonly, there will be a device alert which appears with the notification when you start joining the public Wi-Fi. Later, you must head your phone to the login of the Wi-Fi provider to get connected. When you have troubleshot to connect, you need to try the methods that we are going to share right here.

There are typically two methods to connect to the public Wi-Fi on Android. Read out the ways in the following sections:

First Method

The first method you can try on how to connect to public Wi-Fi on Android is the common process that most people do. Go to the selection of the Wi-Fi network on your Android and phone Wi-Fi settings. This way, you will get free Wi-Fi with the best speed of the connection. Later, you must go to the authentication page or portal page which may ask you for a password. Another way, just tap on “Agree” option. Finally, you can go browsing on the internet supported by the full speed.

Second Method

If you can’t successfully pass the first method, you may try this second method. This second method is the common way to take when most people get stuck with the portal page. In this case, the connection can’t load up entirely. To solve the problem, here are the guides:

1. Connect free Wi-Fi with your Android

Firstly, you are required to connect to the Wi-Fi like you usually do with the usual steps. When the authentication page comes at your screen, you have to connect to the network as soon as possible.

2. Get gateway number from the network screen

In order to load the network authentication page, type the IP address manually in the browser. The page will be loaded and with the common default of IP address of 192. 168. 1. 1. You can try this IP address to load the authentication page.

3. Load the portal page or login manually

The third page dealing with the second method on how to connect to public Wi-Fi on Android is to log in manually. In this case, you can tap on the right arrow near the Wi-Fi name on your Android. This step will lead you to go to the next Wi-Fi network details windows where you may find out the Gateway IP address. When you get the IP Address, thus, you connect to the network.

Conclusion

Overall, there is no problem coming without a solution. If you get stuck to connect your Android with the public Wi-Fi, don’t hesitate to open this page again and find out the solution on how to connect to public Wi-Fi on Android.

Continue Reading
Info

5 Newest Adobe Photoshop Update You Have To Check Out

There are so many reasons why Adobe Photoshop places the highest rank not only as of the top photo editing software but also as artworks production software. Coming with a number of versions to meet the users need, Adobe serves the best functions through its features and other capabilities.

Times to times, Photoshop is getting better through the developing new features and new versions. The Creative Cloud membership enables you to always get the versions as soon as there is a new release. Each different version provided by Adobe certainly brings the new different features you can optimize. Thus, make sure you always keep in touch with this software to get the information about the newest version you might need.

To enrich you with sufficient information, here are the newest updates of Adobe Photoshop you can check out.

5 Newest Adobe Photoshop Update

  • Frame Tool

As the most widely used photo editing software, Adobe Photoshop is recently updating the frame tool. These updated features enable you to create a shape on the canvas as well as to drag and drop images to fill the frames. Later, the images will scale to get the right fit.

  • Experience of New Content-Aware Fill

The next newest update of Adobe software you have to check out is the experience of new content-aware fill. Along with the dedicated workspace available, you will be able to select the accurate pixels to use in the fills. In this case, Adobe Sensei will enable you to easily rotate, scale and mirror them without any restriction. This what you call new content-aware fill experience.

  • Symmetry Mode

Later, you must also check out the newest update of Adobe Photoshop that is Symmetry Mode. The perfect symmetry is commonly painted by a new mode that allows you to define your exes and select out of the presets formulas including the circular, spiral, radial, and mandala.

  • Users Experience Improvements

The next newest update highlighting you is the users experience improvements. These include the latest enhancements such as multiple undo, faster ways of cropping, transforming and entering the text using the auto-commit. Besides, the latest enhancements also include the proportional transformation of pixel and type layers in the default setting.

  • Fast and Easy Startup

The fifth new updates offered by Adobe Photoshop is a fast and easy startup. The step-by-step tutorials are always available to help you learn how to use the software easily and quickly. The tutorials generally cover not only the basic techniques but also the advanced techniques for advanced users.

The way you get started the software is also considered fast and easy. Just find the right tutorials and follow every step to run the software well without any significant distractions. In short, it is always easy and fast to use Adobe Photoshop no matter you are a beginner or advanced user. Whatever version you use both Adobe Photoshop CC, Adobe Photoshop CS5, CS3, CS4 or CS6 you can use it proficiently because almost all the tools in Adobe Photoshop have the same function.

Conclusion

Conclusively, Adobe Photoshop provides you with the newest update you will never find in other photo editing software. Make sure you have this software on your PC and use it to design anything or editing images with the best result as you are expecting.

Continue Reading
Info

[Guide] How To Delete Bookmarks on Google Chrome

Bookmarks on Google Chrome

The bookmark is a useful tool in our Chrome browser to ensure we wouldn’t lose the web address we desire to visit again. But after a while, the growing list of the bookmark can be frustrating. Thus, we wish to delete some. To do that, there some ways on how to delete bookmarks on Google Chrome from a computer and mobile devices.

How to Delete Bookmarks on Google Chrome from PC Browser

In total, there are three methods on how to delete bookmarks on Google Chrome from your computer browser. Some people prefer may prefer one than the others because of some reason. Therefore, you may choose your preferred method after trying these:

  • Delete from Opened Starred Page

Delete Bookmarks

Just like how you bookmarked the page by clicking on the star icon at the right side of the address bar, you can also delete it from there. First, you should open the bookmarked page you want to delete. Click on the star icon until the command dialogue appears, then click Delete. You have successfully deleted the bookmarked page if the star icon turned hollow.

  • Delete through the Bookmark List

When you open your browser Setting (the three dots vertical button at the top right), you will find the bookmark menu. Point your cursor to Bookmark to expand the bookmark menu, and also there will be your bookmarked pages listed below. To delete it, you have to navigate your cursor to the bookmark you want to delete, right click, then click on Delete. If you activated your bookmark bar, then this task will be easier since you only need to expand the bar and right click to Delete.

  • Delete by Bookmark Manager

Just like the previous method, open your bookmark manager through the setting (Setting à Bookmark à Bookmark Manager). Or you can also use the shortcut by pressing the combination of CTRL + Shift + O at the same time to the bookmark manager directly. To delete the bookmark, right click on the bookmark then click for Delete. You can also left click to select the bookmark then press Delete key on your keyboard.

How to Delete Bookmarks on Google Chrome from Mobile Browser

Even though it has the same basic, but deleting the bookmark on Google Chrome from a mobile browser is also different. The reason is Chrome for a mobile browser has simpler features than the web. That way, look at the explanation below:

  • Android

To delete the Google Chrome bookmark in Android, you have to open the Setting menu (three vertical dots) and tap Bookmark. You will see your bookmark list, and on each list, there are others three-vertical-dots at the right side. Click on the dots of the bookmark you want to delete, then click Delete. Also, you can delete by open the bookmark page, click the icon until the bookmark dialogue appears, then tap for the trash bin icon.

  • iOS

Different from the Android, in the iOS the Setting menu appears as three horizontal dots, click that then click Bookmark. To delete one bookmark, simply swipe left and then tap for Delete. But if you wish to delete two or more bookmarks, click on Select at the bottom of the page, then click Delete.

Now you know the methods on how to delete bookmarks on Google Chrome for both web and mobile. That way you can organize your bookmark list and wouldn’t miss some bookmarks you truly need over the trivial ones. And while deleting, make sure that you’re removing what you want to delete.


Continue Reading
Info

How the Antivirus Program Works and Deal with Threats

Antivirus Program

What comes to mind when you are thinking about a powerful and handy antivirus program? A well-known name and brand? A trusted and reliable service? A wide array of features? The simplicity in operating or managing the task? When it comes to choosing the right antivirus, things can be complicated and confusing. You need to realize that there is no such a thing as a perfect antivirus. The right antivirus exists but it depends on personal preference and needs. That’s why you need to understand the basic function of such a program before making a decision.

The Functions of an Antivirus

Basically, the antivirus program will be your first defense against threats and attacks. If you have a solid and very good antivirus, then you won’t have to worry about a thing. The program basically will filter out everything that comes to your computer. It will filter the contents and track the sources, and then it will record the data. All the information will be collected inside the database to make sorting out process easier.

The program will monitor your computer system all the time – basically 24/7. If there is something suspicious (whether it is an activity or a file), then the program will filter it out, record the data, and keep it in the database. It will index the suspicious file or folder, catalog it, and store the information. Once it is kept in the database, it will set up the basic info for further activities. When it is updated, you can get the most benefits out of it.

There are two major operational types of the antivirus: the active one and the passive one. Passive antivirus requires the users to perform the manual scan or have a scheduled checking of the virus. The active one runs automatically. It usually detects in a real-time manner and immediately fights threats.

Virus Handle and Treatment

Antivirus Working

In most cases, the antivirus program will have 3 basic options when it finds any suspicious activity or files.

  • Deletion. In most cases, antivirus software will automatically delete the file. After all, deleting it will be the best choice because you generally remove the threat for once and for all. However, some viruses are pretty ‘clever’ and they make themselves unable to be deleted. If this happens to you, then your only option is the second one.
  • Quarantine. The antivirus software will quarantine the virus –separating it from the others. By isolating the threat, it is expected that the file or folder won’t be able to spread and infect other files. By isolating it, it is expected that further damage can be prevented or at least minimized.
  • Ignorance. This is the least favorable option because your antivirus will basically do nothing. Such a program usually tries to come up with a solution first. But when it is helpless, it simply ignores the threat. Such a thing can also happen when the antivirus is pretty weak and lame.

This is a common thing that usually happens in the antivirus program. Such a program like Smadav 2020 can provide an extra benefit, especially if you want to scan external devices.  It doesn’t hurt to use an additional antivirus program besides the main one.

Continue Reading